Poor-over coffee
Sorry for my absence this past week. I've been on my phoneymoon - the first few days after I
get a new phone and have to sort through everything and arrange my home screens
and customize and organize the hell out of it until no one knows how to use it
except me. (oh the poor sales guys at AT&T trying to figure out my old s7
when I traded it in)
I'm still not quite
finished, though it is getting there, but I tore myself away (not really
though, as I'm blogging from the phone) long enough to make a post -
surprisingly not about technology. Well, not directly. Instead, it's about how
to make a cup of coffee so that you've got enough awareness to make a blog post
when you spend all your extra money on things like phones so you can't afford
to put out like $15 for a coffee pot. I expect it to have wide appeal.
Seriously though, I
just don't usually like regular drip
coffee. I love espresso, and espresso drinks, and I bought a moka pot about a
decade ago for around $8 at a TJ Maxx. A moka pot makes kind of an espresso-ish
coffee, is highly recommended by me, and if you find one in a discount store
near you, definitely pick it up. The handle broke on mine, and though it still
technically works, it's a pain to get it off the heat.
So I switched to
"pour-over" coffee. I'd heard the term, but nothing about it, so the
first time I made it, I plopped a coffee filter into a Mason jar, dumped some
coffee in, and poured a cup of (initially) boiling water through the grinds. It
took about half an hour and I poured in as much water as it could hold, waited
for it to all drain through, then repeated. While it was filtering, I thought
maybe it would be best if I looked up what pour-over coffee actually is and
some tips on how to make it. That's right, as
I was in the middle of making a cup.
What I learned is
that you can spend a lot of money making pour-over coffee at home. But if
you're like me and totally not a coffee snob, you can also make it for way less
than you'd spend on even a regular cheapo drip coffee pot.
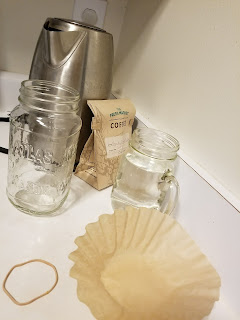
Here's what you
need:
A coffee filter
A rubber band
A Mason jar or two
Coffee (whole beans
preferable but I use pre-ground)
Water
Grinder (optional
but required if you've got whole beans, obviously)
Electric or stovetop
kettle (optional)
Here's how you do
it:
There's really only
one trick. There are a few little tips I learned, but the only big thing is one
I figured out myself: you must fold the filter into a cone shape, if it's not
already a cone filter. That was the mistake I made the first time around that
made me first cup take the better part of an hour instead of a few minutes. The
water flows too slowly and the grounds get over-extracted and the coffee tastes
too bitter even for me, lover of extra-dark chocolate and extra-hoppy beer.
Once you have a
conical filter, it's pretty straightforward. Place it in your Mason jar, secure
it with a rubber band around the rim, fill the filter with coffee grounds, and
slowly pour boiling water over. You can boil the water in your kettle, or in a second
jar in the microwave, but it's nice to have something with a spout for pouring.
(Hell, a gravy boat could work if it held enough water.) Try not to let the
grounds drain all the way. Ideally, you would pour in at the same rate it's
draining out the bottom. Make sure to pour around all of the grinds. Don't just
pour in the middle.
You can wash the
filter before you put it in the Mason jar, but honestly I don't notice any
difference if I don't.
If you put some ice
in your Mason jar before putting in the filter, you can make "Japanese
iced coffee." I personally prefer cold brew, but it's not nearly as fast,
and I'm not all that picky.


Comments
Post a Comment